Showing posts with label Android. Show all posts

3.04.2012

Sony Tablet S Review

A few months ago, I sold my Motorola Xoom to a friend as I determined that I really don’t use the tablet enough to keep it around (it was sitting locked up in my fire safe for months on end).  Last week, I was trying for find a decent way to view comics on my iPad- and realized that it just cannot display a readable page unless I zoom in; I think it is a combination of the aspect ratio and lower resolution that makes it just uncomfortable to read full screen (perhaps that will change with the iPad 3?)- so I decided that I ‘need’ another Android tablet to do this and other things…

3478046 LeftMy three choices were the Samsung Galaxy Tab 10.1, the Transformer Prime and the Sony Tablet S.  The Sony Tablet S won out due to it’s form factor and features, such as:  IR transmitter for remote control, ability to pair with a Sony PS3 Sixaxis controller and the very nice way it acts like a big-ass Chumby when docked (there is an included Chumby app).

I used the Sony for about a week and I have been fairly happy with the performance- but not so happy with the ‘portability’ options.

The system is fairly responsive and battery life is very good- I would estimate I can get 4-5 days of normal casual use out of the tablet; checking gReader a few times a day, checking email, surfing the web, and occasional Netflix movie, etc. Leaving the unit in standby doesn’t seem to drain the battery life at all. Granted, it doesn’t have iPad battery longevity, but it lasts a hell of a lot longer than my Motorola Xoom did.

The screen is very nice; sharp and clear, nice color, and the perfect format for reading comics or magazines. Resolution is the typical 1280x800 found on most tablets and the viewing angles are pretty good.  With ComicRack for Android I was catching up on my comics and a few magazines I have neglected for the past few months.

The remote control is pretty nice but lacks several devices (or at least ways to find such devices- such a the Popcorn Hour C200 and the Sony NSZ-GT1 Google TV/Blu-ray player) but it can learn them one button at a time form the old remote.  I also had more than one occasion where the remote would stop working for one device (my C200) and would not return control until I killed the app and restarted.

The form factor is very comfortable to hold; it is like a rolled over magazine providing a good grip and always giving the proper orientation to find the power & volume buttons (on top if holding thick part in left hand). This can however cause some issues with generic cases designed for flat tablets.

The included Crash Bandicoot game is pretty fun when using a Sixaxis controller.  Gameplay is decent (dual core Tegra 2 CPU) albeit it felt a little laggy at times.  NES/SNES emulators are also enjoyable (once you get the controls configured for the Sixaxis).  To pair the Sixaxis, you will need to purchase a microUSB to USB A female cable (such as the Sony SGP-UC1 for $14) to pair the controller; the cable can also be used to connect other USB devices (keyboard, storage, etc.).

Memory is one down-side of the tablet; the 16GB version has 8.92GB available for storage (music, movies, etc.) and 3.94GB allocated to Android application space -leaving about 3GB dedicated to system use.  It does have a SD card slot (yes- full sized SD Card- not microSD), but this can only be used as storage for transferring music/videos/eBooks/etc. into the internal memory; When a SD card is inserted a ‘File Transfer’ program pops up.  This behavior is also true if a USB storage device is attached to the ISB host port. Looks like I won’t be putting much of my FLAC music collection on the device…

The main issues I have with this tablet are the accessories options:

I was able to find only a single slipcover specifically designed for the Tablet S; it is made by Sony and it is $100.  Let me say that again- there is a slipcover case (i.e. it doesn't even hinge to hold the tablet) and it costs one hundred fucking dollars…  I expect to see these on closeout for $30 in the next few months.   There are other 3rd party cases can be used (such as a generic neoprene slipcase for $15) but I am astounded that Sony would only provide one $100 option for protection of their tablet.

EDIT: looking at Sony’s accessory website, there does appear to be a new offering for ‘STM Skinny’ case for the Tablet S- along with two offering from Targus.

Sony managed to create an extreme proprietary (*surprise*) power connector for the tablet and it utilizes an in-line power brick for power- making it pretty much useless for travel.  A spare/replacement power brick costs $40.  The optional dock for the Tablet S provides charging via this odd connector, but the dock does not come bundled with a power supply -and also costs another $40.  These prices are somewhat on the high end with similar offerings for other tablet devices, but the connector choice makes the only charger option very bulky when compared to the ‘wall wart’ charging common to other tablets (and makes a generic or USB powered option impossible).

The power connector is very reminiscent of the old power connector used on the Sony Clie line of Palm PDA devices from about a decade ago.

I have not seen an automotive charger option for this tablet; a power inverter could be used, but this adds additional bulk for a portable device.

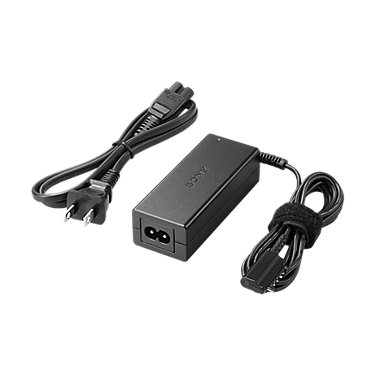
 

All said, the Sony Tablet S is a very good Android tablet; it has several features that others do not and its unique shape is comfortable to hold for reading.  However, the charging options make this device much less attractive for use when travelling- so my tablet is going back to the store tomorrow. 

I will likely try out one of the Samsung Galaxy tab options and see how they fare for portability.  I would prefer an Asus Transformer Prime option, but these devices are sold out in almost every store (Frys, BestBuy and MicroCenter) and as well as Online (including a vendor that is charging $50 over MSRP).

Some pics of the Tablet S:

DSC00574
Tablet in dock running the ‘Cassandra’ application

DSC00577
Sample page from ComicRack

DSC00578
Sony Custom application drawer.

DSC00581
View of gReader for Android (but nothing is quite as nice as Flipboard- when is this coming to Android!?!)

12.12.2011

PlayerPro for Android and AE2i

SC20111211-235338I have always been one that thought the price of the Bose headphones was insane- $150 for a pair of headphone?  They must be crazy!  But lately I have been seeing the ‘Beats by Dr. Dre’ headphones- and those are just fucking stupid in price- $500 for a set of headphones?  Kids these days…

Long story short, I actually tried on a pair of the Bose AE2i headphones- and I was pretty impressed with the sound.  Since it is return season (xMas holidays have an extended return period) I decided to purchase a pair of the Bose AE2is- and I am now actually considering keeping them...

Over the past few days, I have spent many hours re-ripping all of my music in FLAC format and then converting to Apple Lossless so I can play on my iPod.  After wasting a bit of time doing this, I realized that my Samsung Droid Charge can play FLAC music natively with the built-in Samsung music player (also works with PlayerPro and PowerAmp)…

I purchased a 32GB MicroSD a few months ago, and I believe I will be able to fit a bit more than 1/2 of my music library when most of it has been converted to FLAC format.

I really started using PlayerPro- and I am very impressed with this software; this makes my phone one of the best MP3 (and FLAC) players I have ever used- iPod Touch/Zune/Sony/Sansa has nothing on this App.  If you download this software, make sure you play with all the settings- specifically the lock screen settings/widgets- and the headphone controls/volume button overrides…

I think what I really like about this program is that is can change any/all of the functionality of the Android OS- something that Apple and others strictly forbid when working on their hardware.  :)

Ya Gotta love technology!

11.12.2011

Samsung Galaxy Player 5.0

SNAGHTML135a3c0bI picked up the Samsung Galaxy Player 5.0 about two weeks ago at BestBuy.  The Galaxy Player is essentially the gutty-works of a Samsung Galaxy phone but without the carrier radio,  using a LCD panel instead of AMOLED screen and featuring lower resolution front/rear cameras.  It is available in 4" (the 4.0 model) and 5" (the 5.0 model).

The device I purchased is running a flavor of Gingerbread and has a single core 1Ghz CPU and 8GB of built-in flash storage.  I immediately installed a 32GB MicroSD to allow for music and other media storage.

The device is very responsive- much more so than any other Android phone I have owned (a list which currently includes the HTC G1, Motorola Droid, HTC Incredible, Motorola Droid X, Google Nexus One, LG G2x and Sony xPeria Play) which is what I have come to expect after trying the Samsung Galaxy and Galaxy S phones in kiosk displays.

This device is designed to be an iPod Touch competitor (even the box it cam in looked eerily familiar to an Apple iPhone package, including white ear buds) and it does a pretty decent job.  The main issue I see with this tactic is the device thickness (to accommodate the large removable battery)- however this shortcoming is readily overlooked when you consider the better cameras, inclusion of a GPS module and microSD expansion.  If you have a mobile hotspot, another sell point is the Galaxy Player makes for a good turn-by-turn GPS device via Google Maps navigation.

The battery lasts about two days when on 'standby' and lasts most of a day when listening to music or audiobooks.  I installed the Audible app and listened to a book for almost 6 hours over Bluetooth headphones and the battery was still over 50%.  Video and CPU intensive games do draw the battery down a bit faster (as anticipated).  Plants vs Zombies looks great on the 5" screen I and playing for 30 mins dropped the battery charge about 8%; if the battery drain is linear, I estimate I could play for about 5h 20m before needing it would offer a low battery notice.

I love the form factor and performance of this device, but for me personally it will definitely be a YADIRDNN (Yet Another Device I Really Do Not Need).  With the upcoming release of the Galaxy Nexus I am sure this device will end up on eBay soon thereafter.

This device is perfect for someone that already has a phone and wants a nice Android device without a service contract.  It makes for a good MP3 player, but I find the iPod Touch to be a little more enjoyable to use- and the size/battery life ratio of a Touch is near impossible to meet.

If you are an iPhone user and you want to try out the Android ecosystem, then this is the perfect device for you.  However, if you are a Android phone owner with a fairly recent device, there is not too much new here- especially if you are a Galaxy S/II owner- and I would recommend looking elsewhere if you are in search of a dedicated MP3 player.

11.01.2011

New Stuff this Week

It has been a week of many interesting things...

This morning I opened Google Reader and found it had been updated with a new interface and a tie-in to Google+; the same has happened for Blogger.  I like the new look, but the new navigation & search bars are taking up about 20% of my viewable screen of my laptop (1440x900)- hopefully there will be a way to change/turn these off in a future post.

I found an easy way to root my Verizon Sony xPeria Play (R900x) and I was able to use Root File Explorer to free up some  space by removing the Verizon crap-apps (Verizon Navigator, MyVerizon, Verizon Apps, etc) and my removing the built-in apps that can be moved to SD card once re-installed (Skype, Kindle, etc).  There is a good post on XDA Developers that has info on which apps are safe to remove and where they are located.

I am still waiting on my Google TV update on my Sony NSZ-GT1 player.  I received an email stating that updates will be rolling out 'over the next few weeks', but I want this update now!

It appears that USPS has updated their tracking page; it now looks like it belongs in the 21st century.

I am so ready for the Galaxy Nexus phone to be released on Verizon; hopefully Verizon will not screw me over by charging $200+ more for a subsidized phone with a 2 year contract renewal vs. new subscribers on the same contract.  If this is the case, I will be porting my number over to Google Voice, canceling my Verizon account and coming back as a new user (except that I will loose my 'unlimited' data plan- d'oh!)

7.23.2011

Nexus One Root on 2.3.4

I recently purchased an old T-Mobile Nexus One from a friend as I am looking to move to T-Mobile in the near future.  In spite of this phone being released almost 18 months ago, it is still a friggin’ awesome phone!  It runs smoother than my Droid X and seems to be much more stable.  I guess that is a benefit of being a Google flagship device where the updates all come direct from Google.
A quick revisit to the Google Phone page that originally only sold the Nexus One direct to consumers now shows fifty-four (54) different Android phones and Six (6) Android tablets; a lot has changed in the last year and a half. :)
When I received the phone it was in it’s original state with Gingerbread 2.3.3 installed.  I played with it for a few hours, installed the 2.3.4 update- and then decided to root it.  :)
These instructions are for a Windows system.

1st step is to void the warranty by unlocking the bootloader:

1. Download and install the Android SDK from Google.  You will need to install the Java Development Kit (JDK) for your system to execute the SDK setup (it will tell you if you don’t have it).  When you first run the SDK Manager, it will mark several items for download- if you are an actual developer then you will probably want to download all of these. Otherwise you will only need the USB drivers (both regular and Google), the SDK tools and the SDK Platform Tools. 
2. Download fastboot and put it in the folder containing the ‘AdbWinApi.dll’- most likely this will be under a folder called \platform-tools found under the main path where the Android SDK is located. (This is created when the SDK Platform Tools module is downloaded in the prior step.)
3. Put the Nexus One into fastboot mode by powering down and holding in the roller ball when you power back up.  You should get a white screen with three skating androids across the bottom.  When you plugin your phone via USB the phone should indicate ‘fastboot’ in the screen.  If not, check that the USB/phone drivers were detected properly in device manager.
It is now  time to go to a command prompt…
4. From the command prompt, navigate into the \platform-tools folder.  From here, execute the command:
     fastboot devices
If all the files are in the correct place and the USB drivers are installed properly your Nexus one should be listed.
5.Next, type:
     fastboot oem unlock
This will bring up a confirmation screen on the phone.  You must use the volume up/down buttons to move and power button to select.   Note: selecting yes will invalidate any warranty you have on this phone and will reset the phone to factory settings- i.e. it will erase the phone and start you over with the android setup screen on next boot!

Change the recovery image and apply the root patch.

1. In the phone, go into Settings –> Applications –> Development and enable ‘USB Debugging’ (this will be needed for testing much later).  When you plug the phone in you may need to specify another device driver from the \usb_driver folder if Windows does not automatically find the correct driver (it may be show a ‘Nexus One’ under Unknown Devices if the driver is not correct).
2. Download the su-signed zip and save it onto the MicroSD card of your phone.
3. Download the Clockwork recovery image and save it into the \platform-tools directory on your computer.  In this case, the image is called ‘Clock.img’.  If you use a different recovery image, the information in the next step should be changed to reflect the proper name.
4. Boot the phone into bootloader mode by holding in the scroll ball while pressing power.
4. Back to the command prompt and navigate to the \platform-tools directory.  Type the following
     fastboot flash recovery Clock.img
     fastboot boot Clock.img

5. The phone should reboot into Clockwork recovery.  Select ‘update from ZIP on SD card’, select the su-signed zip and confirm the update.  The update should go fairly quick.
6. use the power button to go back to the main menu.  Select ‘reboot device’ and press power again.
The phone will reboot and you will have root access.  The Superuser application will be present in the applications list.
To verify that everything installed correctly, make sure your phone is plugged into USB and unlocked with USB debugging enabled.  From the command prompt under the \platform-tools directory, run:
     adb shell su
A superuser request should pop up on the phone screen.  if you accept, your su will run and the shell prompt will change from ‘$’ to ‘#’ to indicate root access.

4.03.2011

Droid X Gingerbread Update

A pre-release of Android 2.3 (codenamed ‘Gingerbread’) has made its way to the DroidWord Forums.
I have been running a variant of Gingerbread with Froyo via the Liberty 1.5 ROM, but there have been some stability issues (occasionally the screen goes off and it will not come back without pulling the battery)- so a semi-official release of Gingerbread sounds great.
The upgrade requires that you go back to the stock 2.3.340 ROM from Verizon; for this you need to download:
Boot the droid X in recovery mode by holding down the volume + and camera buttons while powering on.  Once the text screen comes up, plugin to your PC and restore the SPF file via RDS Lite.  Note:  There are some issues with the x64 drivers not working on some systems.  I was unable to get this to work on my MacBook Pro in BootCamp, but it worked without any problems on my gaming PC running.
You will likely need to wipe the settings on your phone as it will be stuck in a boot loop that will go to the boot screen and then restart.  Do this by booting the phone while holding down the 'home’ key.  The phone will bootup to a yellow exclamation triangle; press the ‘search’ key to bring up the recovery menu.  Select ‘restore factory settings’, wait a few minutes and reboot when it is done.  You are now back to a factory version of Droid X 2.3.340 ROM.
Do a basic setup that will allow you to get to the options menu where you can enable ‘unknown sources’ in the application settings menu.
Now you will need to re-root and re-install the Droid X Recovery boot loader.  Download:
Install both apps on your Droid X.  Run the Z4 root and establish a permanent root.  The phone may need to reboot once root is obtained.
Download the Rooted Droid X Gingerbread release and copy it to the root of your SD card on the phone. 
Run the Droid X recovery and run the ‘Bootstrap Recovery’ and then ‘Reboot Recovery’.  This will reboot the phone into recovery mode. 
Finally, navigate the recovery menu to install the Rooted Droid X ROM you installed form the SD card.  One more reboot and you should be running a semi-official version of Gingerbread on your Droid X!
The official release of Gingerbread expected to be released on March 27th, but is rumor is that Verizon rejected the update as it needed additional fixes from Motorola.  There is no estimate when the official release will be finalized, but his version should keep me happy until the final version has been rooted!  :)

2.10.2011

Honeycomb on Nook Color

There is a custom build of Android 3.0 (Honeycomb) available for the Nook Color.  This particular build is designed to run from a MicroSD card (opposed to some of the Froyo eMMC versions which reflash the internal memory), albiet I am not 100% if it requires the Nook Color to be rooted...

On a MacOS system, download the image and do the following:

  • Open a terminal window
  • Insert a MicroSD card into the Mac
  • Use “diskutil list” to determine the disk# of the MicroSD
  • "diskutil unmountDisk /dev/disk#" to dismount the MicroSD
    Respons should be "Unmount of all volumes on disk was successful"
  • dd if=nookhoney04.img of=/dev/rdisk# bs=1m
    Note: be VERY careful you have the correct disk- otherwise your Mac might be running Android on next boot!
  • Wait
The disk image will take several minutes- depending on the write speed of your MicroSD.  

Once complete, shutdown your nook, insert the card and you should see the Android boot lolo on power-up.

2.06.2011

Firmware Updates

Liberty ROM v1.5 has been released for the Droid-X; this is my current ROM of choice for my Android phone.


Also notable is there is an untethered Jailbreak for iOS 4.2.1 from GeenPois0n.

9.10.2010

Android Desktop Notifier

Just found a neat little application for my PC and Android device that allows for notifications of SMS messages, calls, emails, battery alerts, etc. from my phone to be displayed on my PC.

Setup Instructions

Android application market link:

Desktop Client Download 

Pretty easy install; enjoy!

Unfortunately, you will need to install Java (argh!) to get this to work…

8.20.2010

Froyo (Android 2.2) for Droid X

Rumor of an early leak of the 2.2 OS for Droid X from My Droid World.

Downloading now; no possible way I will be able to return my current phone to ‘stock’ as I went nuts and deleted all the stupid apps and crazy ringtones.

Going to try update.zip and see what happens!  Surprised smile

Mirror One - Download Now
Mirror Two - Download Now
Mirror Three - Download Now

EDIT:

<sigh>

Verifying Current System
assert failed: apply_patch_check(“/system/app/CityID.apk”,”….”)
E:Error in /sdcard/update.zip
(Status 7)
Installation Aborted

Looks like I need to revert back to stock with SBF

EDIT 2:

I am now running Froyo on my Droid X now! (but no root access)

1st step is to recover to stock:

  • Download the Droid X Recovery package:
      Recovery Image: VRZ_MB810_1.13.6.2_1FF_01.sbf
      Motorola x86 & X64 drivers
  • Install appropriate drivers (x86 or x64) via executable (includes bootloader mode drivers for Droid X)
  • Download and install RSD Lite
  • Once RSD Lite install is complete, copy ‘pst_flash.ini’ over existing file in C:\Program Files (x86)\Motorola\RSD Lite\
  • Run RSD Lite and open the update file: VRZ_MB810_1.13.6.2_1FF_01.spf
  • Put Droid X in bootloader mode:
      Power off
      Hold Camera + Vol down + Power
      Boot will be a black screen with some text
  • Once in recovery mode, plug in the microUSB cable.
  • Verify Device & File Properties look Ok in RSD Lite and hit 'Start'
  • This will take a few minutes and it will eventually reboot.
  • You are now back to a ‘stock’ 2.1 Android for Droid X

Second step is to update to 2.2:

  • Place the 'update.zip' in the root of the SD card
  • Power off the Droid X
  • Power On while holding down the 'Home' key; You will see a yellow triangle-
  • Hit the 'search' button to bring up the menu.
  • Use volume down to scroll down to 'Install update.zip from SD card'.
  • Hit the 'menu' key under 'Ok' to begin the update.
  • Update will take a while- so go do something so you don't stress out while watching the update.

If anything crashes/screws up, restart the RDS Lite app and put the Droid X back into bootloader mode to do a recovery to stock again.

7.22.2010

Droid X Rooted!

That didn’t take very long… I love the rooting/modding/hacking Android community.

This is my addendum to the instructions over at Droid-X Forums

Pre-root stuff (for the non expert at rooting Android- but still with a fair grasp of computer usage)

You will need to download:

Prep Instructions:

  • Install the appropriate drivers for your PC system (i.e. x86 or x64).
  • Enable USB debugging for the phone: Menu –> Settings –> Applications –> Development –> check ‘USB debugging’.
  • Extract the SDK contents somewhere you can access them; I put the files in c:\SDK.
  • Extract the DroidXRoot Files into the ‘tools’ folder of the SDK folder. (For me, C:\SDK\Tools).
  • Open a command prompt and navigate to the SDK tools directory (CD \SDK\Tools if you used the same path as I did).

Follow the instructions over at Droid-X Forums:

Step 1: Set up ADB (this was done in the ‘Prep’ instructions)
Step 2: Push exploid to /sqlite_stmt_journals "adb push exploid /sqlite_stmt_journals"
Step 3: type "adb shell"
Step 4: type "cd sqlite_stmt_journals"
Step 5: type "chmod 755 exploid"
Step 6: type "./exploid" and follow directions on screen
Step 7: type "rootshell"
Step 8: type in password "secretlol"
Step 9: your your’re in root!
Step 10: mount your sdcard to pc and put Superuser.apk and su in the sdcard
Step 11: unmount sdcard
Step 12: in adb (make sure your still in root with the # sign) type in:
- cp /sdcard/Superuser.apk /system/app/Superuser.apk
- cp /sdcard/su /system/bin/su
- chmod 4755 /system/bin/su

Notes:

I could not connect to ADB Shell while the phone was in ‘Mass Storage Mode’- I had to switch to ‘PC Mode’.  I was getting ‘error: device not found’

In step 6, it indicates ‘follow instructions on screen’; I had to run this twice to get it to ‘stick’.  On the second go I was able to toggle the phone’s Wi-Fi on/off via a screen widget to make the phone invoke ‘hotplug’

[*] Android local root exploid (C) The Android Exploid Crew
[*] Modified by birdman for the DroidX
[+] Using basedir=/sqlite_stmt_journals, path=/sqlite_stmt_journals/exploid
[+] opening NETLINK_KOBJECT_UEVENT socket
[+] sending add message ...
[*] Try to invoke hotplug now, clicking at the wireless
[*] settings, plugin USB key etc.
[*] You succeeded if you find /system/bin/rootshell.
[*] GUI might hang/restart meanwhile so be patient.

In step 10, I was unable to mount the SD card on my PC (or I was misunderstanding what they are communicating).  I eliminated steps 10 & 11 and did this:

Exit ADB Shell (should be able to just type ‘exit’)
adb push su /sdcard
adb push Superuser.apk /sdcard
adb shell
rootshell
(enter password = secretlol)
Continue with step 12

5.03.2010

HTC Incredible

imageI moved to Verizon around 10 months ago when they release the Motorola Droid as I was looking for a better Android device than my aging T-Mobile G1.  The original Droid was an awesome device and I have no regrets in purchasing. 

However, in the worlds of computers and cell phones, technology changes fast and last years ‘ultimate phone’ is almost a dinosaur when placed along-side the newer offerings.

Enter the HTC Incredible- also known as the Verizon Droid Incredible.

I am very impressed with the unit so far.  It is very fast device- period.  I have yet to see a freeze or a pause when I want to open an application.

The HTC Sense add-on enables linking between Google Contacts, Facebook and Flickr pages.  It is easy to pull up a friend in contacts and then browse their photos on either of the above services.

However, there are some issues with the device:  I have noticed that in a bad coverage area (where the phone is switching between 3G and 1x EVDO) the phone gets very warm and the battery life takes a nose-dive.

The battery itself will not last me a full day unless I do not use the phone like I normally do: occasional web browsing, price checks, SMS messages, taking a few photos, home alarm system check, webcam camera checks, etc.  I rarely use the phone as an actual phone.

Currently there are not many accessories for the Incredible, but documents from Verizon indicate an upcoming Car GPS cradle, media dock and extended battery in the works.

I will be watching the XDA Developers forums, Droid Forums and Android Forms for a root patch for the Incredible.

ad2gp2

3.31.2010

BlackDroid Ultimate ROM 9.0 Released

BlackDroid has released an update for his awesome Ultimate ROM for Droid- currently at v9.0

 image  image  image

While waiting for the official 2.1 Droid update to be captured by capable hands and made into a user updatable file (rooted Android phones with custom loaders cannot receive the OTA update)- and while also still waiting for the Nexus One to finally fracking be offered for Verizon- this is an enjoyable stop-gap.

Rant: rumor is the Nexus One will finally be released sometime this week and it will have a ‘big surprise’ for Verizon users.  I pray this isn’t something stupid like a custom version of Skype (which currently uses Verizon minutes for domestic calls)- but rather something like Android 2.2, an improved touch screen or replacing the roller ball with a touch pad… </rant>

I used a new program in the Android Market called ‘ROM Manager’; this fairly automates the update process (as long as you have root access) and some how managed to backup and restore all of the apps I had installed prior to the update- including the ones I had purchased through the Google market.  Still trying to figure out how this worked, but very, very cool!

5.23.2009

Android GP2X

So I purchased a GP2X F-200 several months ago; it is a great device.

I switched to T-Mobile to get a G1 ‘Google’ phone a few months later.

Now it appears that someone that might be a big fan of the Reese’s ‘chocolate in my peanut butter’ commercials is developing a GP2X emulator for the G1

I think I may cry tears of joy… :o)

T-Mobile G1 1.5 ‘CupCake’ Firmware available for Download!

image Finally- after many, many (many, many) delays, it looks like the G1 1.5 ‘cupcake’ firmware is up on Google’s site.

Android Community has a post that links to Android Downloads, which then has the direct link to the 1.5 firmware on Google’s site

Bad news is if you have root access and you want to keep it, you should probably wait (unless you want to got through the rooting process again) until a ‘fixed’ version of 1.5 comes out.

If you don’t care about root access you can update by:

  • Download the signed-kila-ota-148830.de6a94ca.zip file,
  • Rename it to ‘update.zip’ (note: by default, Windows hides file extensions- so be sure you are not naming it ‘update.zip.zip’ by un-hiding extensions if this doesn’t work)
  • Copy the ‘update.zip’ file to the root directory of your MicroSD card
  • Power off your G1
  • Power on your G1 while holding down the ‘home’ button
  • When the warning triangle comes up, press alt+L on the keyboard
  • Next hit atl+S on the keyboard
  • It will prompt you to hit home+back to reboot a few times.
  • After this, you should be to 1.5 firmware (and you will need to re-setup your phone)

Now we can start waiting to see if Android ‘Donut’ v2.0 will ever be ported over to the original G1- or maybe we will just need to be happy with the Haykuro 'Hero' build

4.15.2009

G1 Haykuro Update

I updated my T-Mobile G1 to the Haykuro 5.0G build a few days ago and I am loving it; it is more responsive and stable, it has much better battery life, more features, and –did I forget to mention- A2DP!

Google seems to be unhappy that the build ported from the UK was being used on the T-Moble G1 and disabled downloading from the App Store for this firmware version; That wasn’t very nice! At the same time, they announced the SDK for Android 1.5- i.e. what I am already running with the ported build!

Haykuro released a 5.0.1G-r2 version today that addresses the App Store issue- along with another version that allows Apps to be run from the SD (just remember to partition your SD card with a ext2 partition).

Google- please don’t pull a Sony on us by trying to keep ahead of the hacks!

Updating now…

Update on update: Hykuro 5.0.1 appears to have the Latitude version of Google Maps for the G1.

4.13.2009

G1 Update –Success!

I am now running the Haykuro 5.0G ROM on my G1 (with root access) and I have A2DP!

I have been re-installing apps and testing out things and everything seems to be working great- maybe even a little faster than the RC33 firmware I was running prior.

One thing that is missing is the Latitude addition for Google Maps; not a biggie as I have this installed on the Blackberry Storm I carry for work.

In addition to A2DP, the new Bluetooth profile also supports AVRCP and it easily paired up with my Sony BT21 headphones. The sound quality was sub-par until I updated the radio firmware- now it all seems to be clear and as good as the sound from my Samsung P2.

I am testing out the pre-release of Moxier Mail for Exchange, GMail for my personal mail and I can listen to music via wireless Bluetooth (screw the goofy-ass HTC ExtUSB adaptor!); Throw in a Facebook and a Twitter client and I now have a 'do-it-all device’.

(Good thing I purchased a few extended batteries from eBay!)

4.12.2009

G1 Haykuro Builds

A devoted engineer name Haykuro appears to have been working on a port of the Vadaphone Sapphire ROM over to the T-Mobile G1- and releasing a ‘cupcake’ featured build of Haykuro 5.0G (with Google apps) and 5.0.1H (with HTC apps) for the G1.

A comparison of the various features between the stock RC33, JesusFreake 1.42 and the two Haykro builds shows that the later version support A2DP- the one feature I have been waiting for!

Some screen shots/features of the Haykuro builds:

There is a detailed write-up for getting root access and flashing the ROM

Wish me luck- if this fails I will be using an old-ass AT&T burner until I figure out how to resole…